
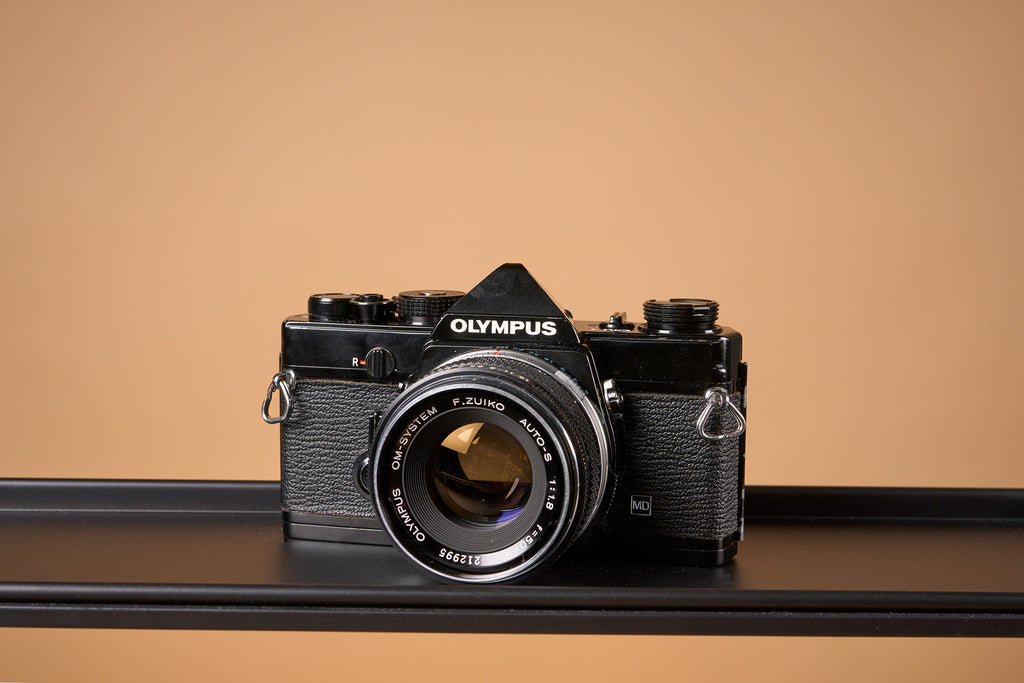
Hey there, OM users! Today we’re going to talk about the camera that started the OM series, the Olympus OM-1. We’ll go over the basic features of the camera, what each button/dial does, how to load film into the camera, and what you’ll see through the viewfinder. We’ll also talk a bit about the benefits of the OM-1 and things to look out for to make sure yours is working properly!
Without further ado, let’s get started! Click below to watch the video or keep scrolling for the text version of this Olympus OM-1 guide!
Table of Contents
- History
- Preparing the Camera for Use
-
Features & Identification
- ISO Dial, Shutter Button, Film Advance Lever, & Frame Counter
- Rewind Knob & Power Switch
- Viewfinder & Flash Shoe Port
- Shutter Speed Dial
- Focus Ring & Depth-of-Field Scale
- Aperture Ring & Depth-of-Field Preview
- Rewind Switch & Self-Timer
- Mirror Lock-Up & PC Sync Port
- Battery & Motor Drive Covers
- Tripod Socket & Serial Number
- Camera Operation
- The Viewfinder
- Common Issues & Conclusion
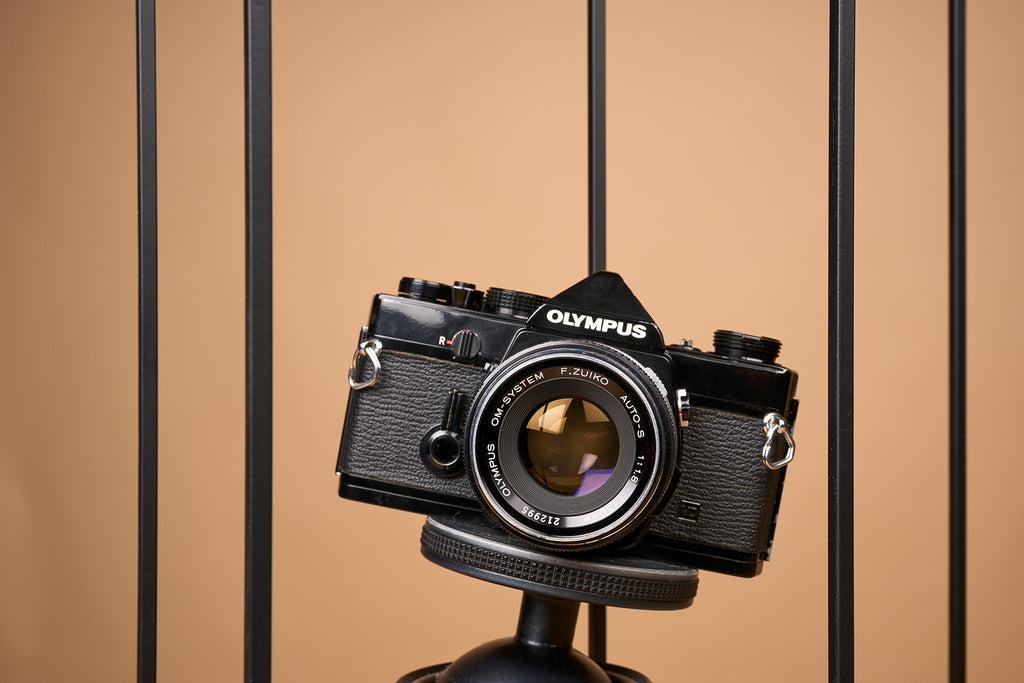
History
The Olympus OM-1 was revealed at a trade show in 1972 to great fanfare. Compared its competitors from Canon, Nikon, or Pentax, the OM-1 was downright tiny without skimping on features. Its success showed other manufacturers that there was a market for compact 35mm SLRs and led to the development of cameras like the Pentax ME Super, Minolta XD7, Nikon FM, and more!
Aside from being small, the OM-1 was noteworthy for having a large, bright viewfinder, being mechanically-driven (AKA not needing batteries for the shutter to work) and for having the shutter ring located around the lens mount. At the time there wasn’t much precedent for where the shutter ring should be, but hindsight has shown us that most 35mm SLRs had their shutter dial on the top plate. We’ll talk more about that later.
Preparing the Camera for Use
Before you get shooting, there are a few things you should check on your camera. We have to make sure we have our lens mounted properly and a battery installed at the very least. Let’s figure out how to do that together!

Installing a Lens
The Olympus OM-1 can use a wide variety of lenses, from fisheyes to portrait lenses to super telephotos meant to take photos of very small birds at very long distances. Before buying a lens, make sure it’s for Olympus’ OM mount. Modern Olympus digital lenses won’t work, but plenty of other manufacturers made lenses that will! Companies like Tamron, Sigma, and Vivitar offer third party lenses for the OM-1 that could be great choices, especially on a budget. Click here to view all of our Olympus OM mount lenses.
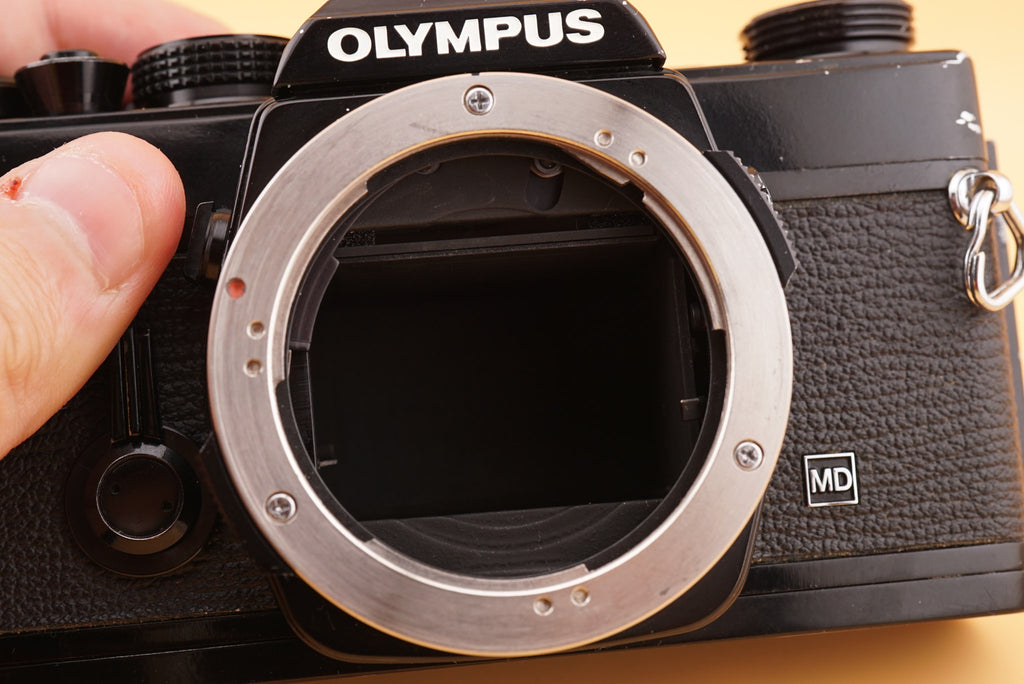
Check the photo below for an example of what the back of an OM mount lens looks like.

But wait, how did I look at the back of the lens?! Isn’t it attached to the camera? Let’s learn how to remove/attach a lens to our Olympus OM-1.
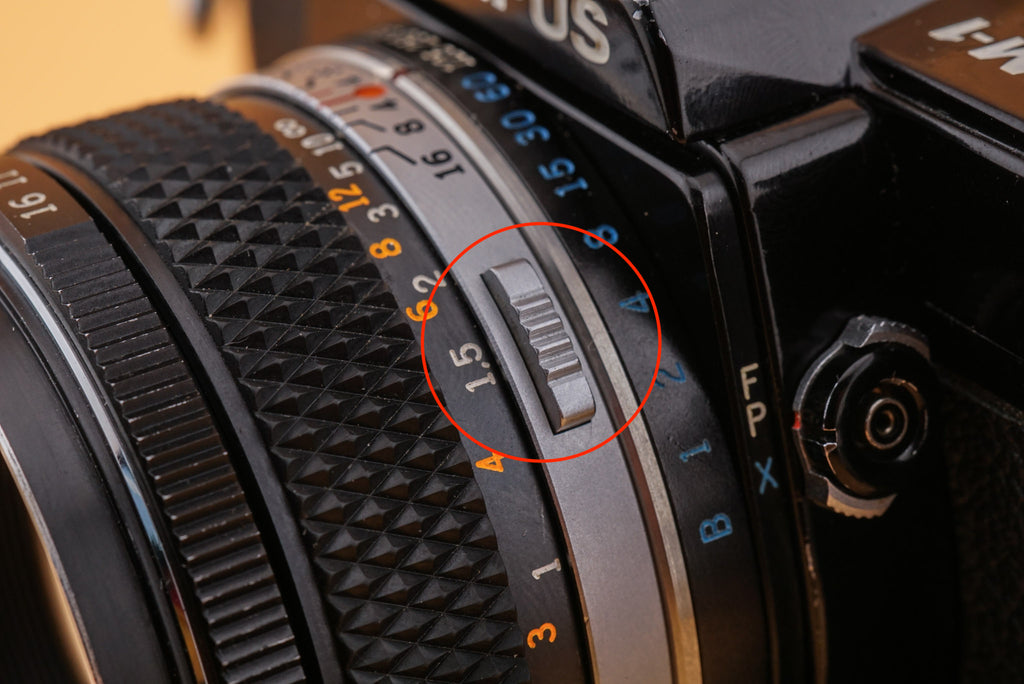
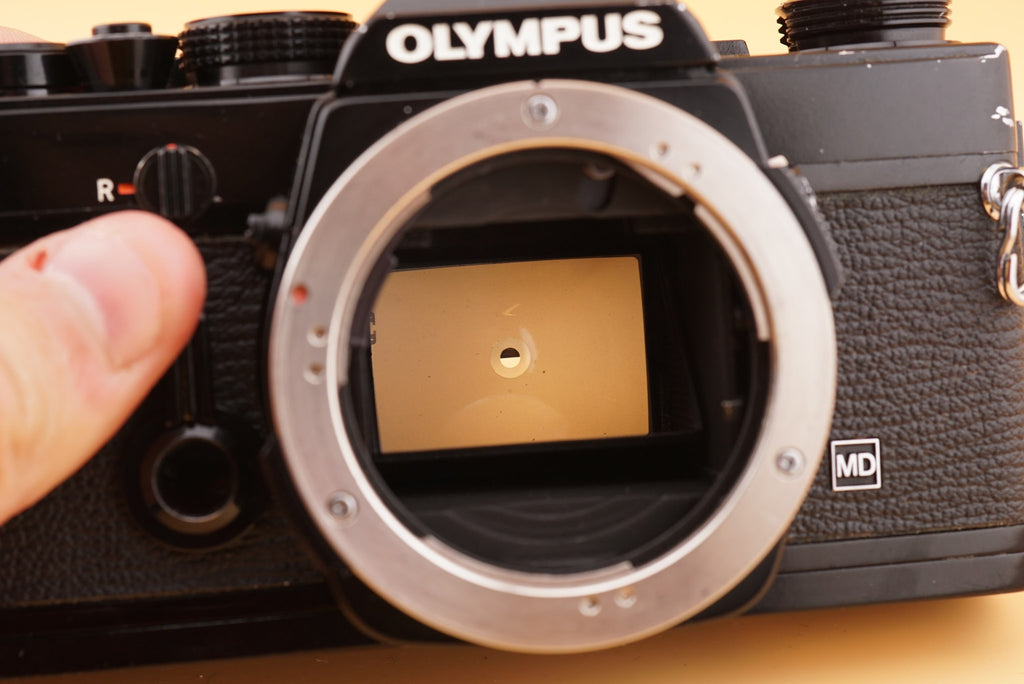
First, let’s locate the lens release button. It’s located on the top side of the lens, and allows us to rotate the lens right before pulling it away from the body. Check the photos below for some details.
 |
 |
 |
 |
To attach a lens, we basically do these steps in reverse. You’ll want to line up the red dot on the front of the lens with the red dot on the lens mount, then rotate the lens left until it clicks into place!
Hopefully, that makes sense. It’s a relatively simple operation, but maybe the video above will show it better. Next, let’s install a battery!
Installing a Battery
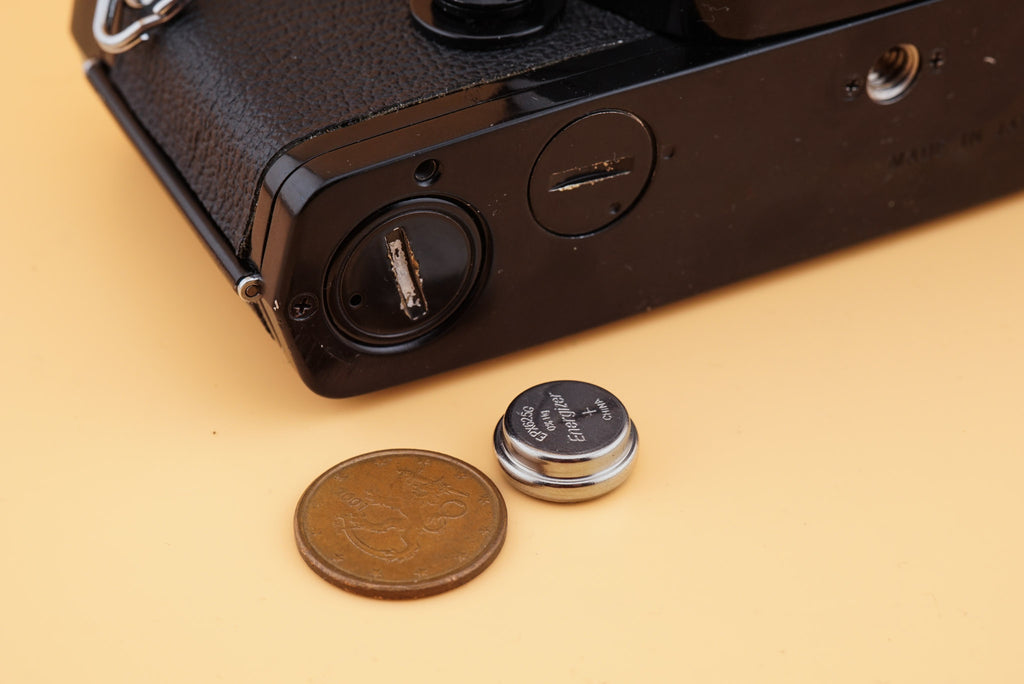
The Olympus OM-1 uses PX625 batteries. Technically, the camera is meant to use a 1.3v mercury version that’s no longer produced, but a modern 1.5v version works well enough for most people. If you’re a more advanced user who’s concerned about the voltage difference, the MR-9 battery adapter will give you the proper voltage with a 1.5v LR44 battery. But for our purposes, I’m going to use a PX625.
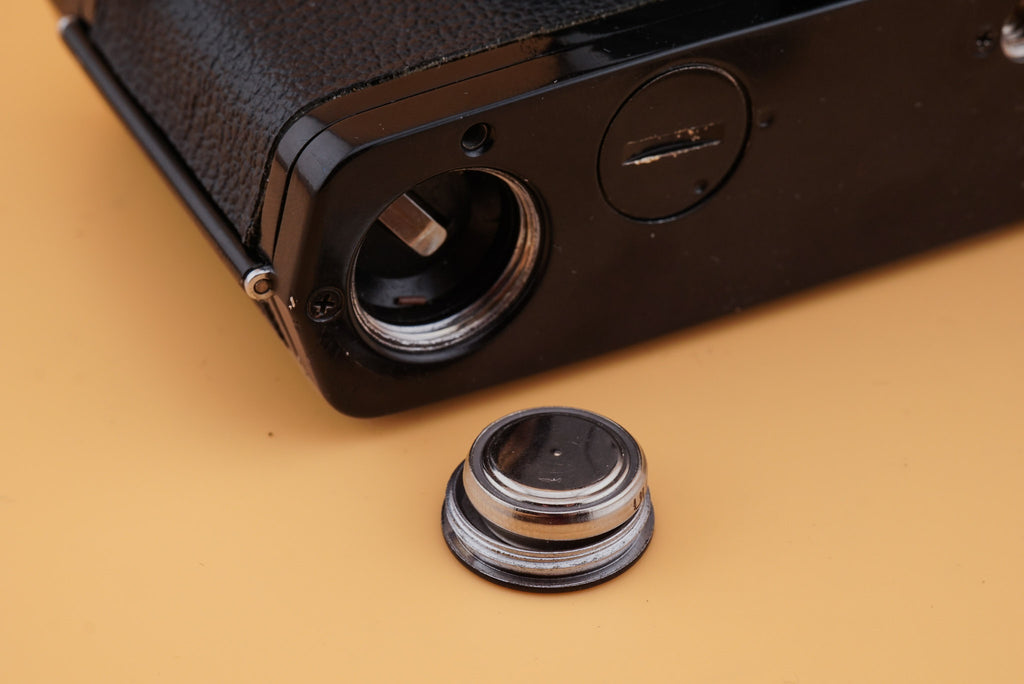
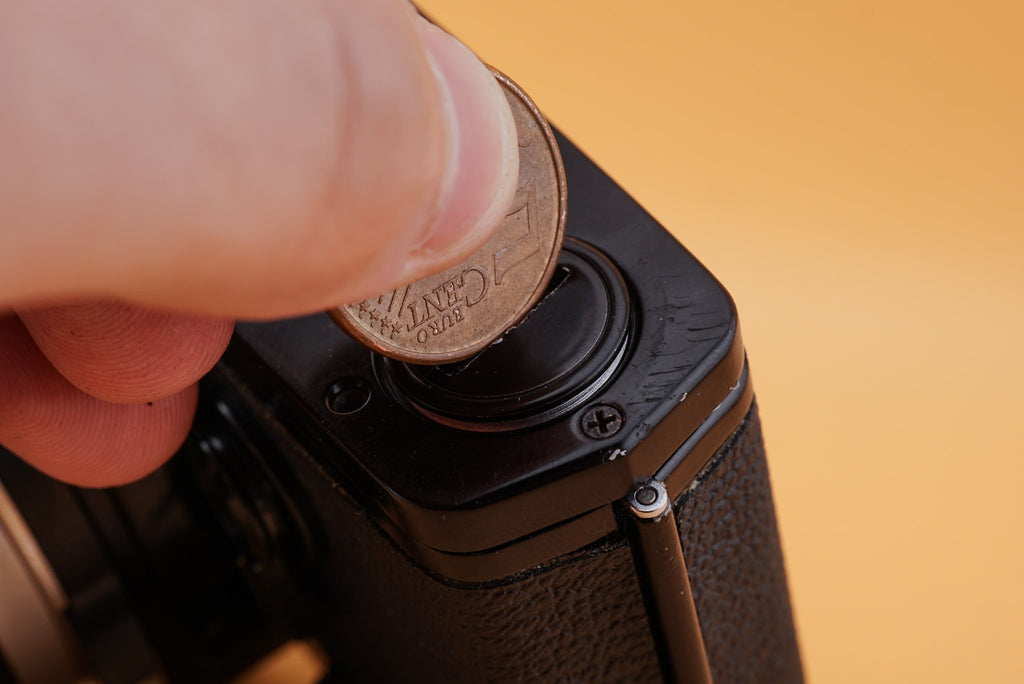
We’ll also need a coin to properly install the battery. Any thin coin will work, it just needs to fit into the slot on the bottom of the camera. Insert the coin into the slot on the far left of the camera’s bottom plate and turn counterclockwise. Eventually, the battery cover will come off.
 |
 |
 |
 |
The battery has to be put in the correct orientation or electricity won’t be able to flow out of it, so be sure to line up the + on the battery with the + on the battery cover. Then you can put the battery inside the compartment and screw the cover back on.
Features & Identification
Now that we have the battery and lens installed, let’s figure out what the heck all the things do on the Olympus OM-1! There are a lot of dials, switches, and other things on the camera that may be intimidating, but fear not! We’ll break down everything you’ll need to know to use your OM-1. Let’s get started with the top of the camera!
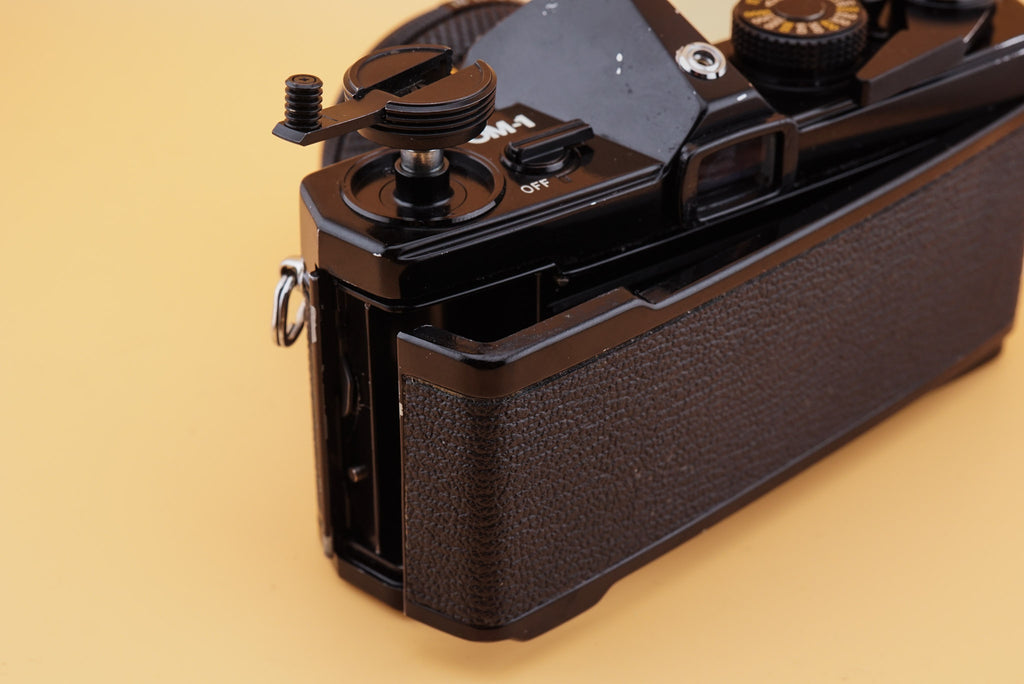
Rewind Knob & Power Switch
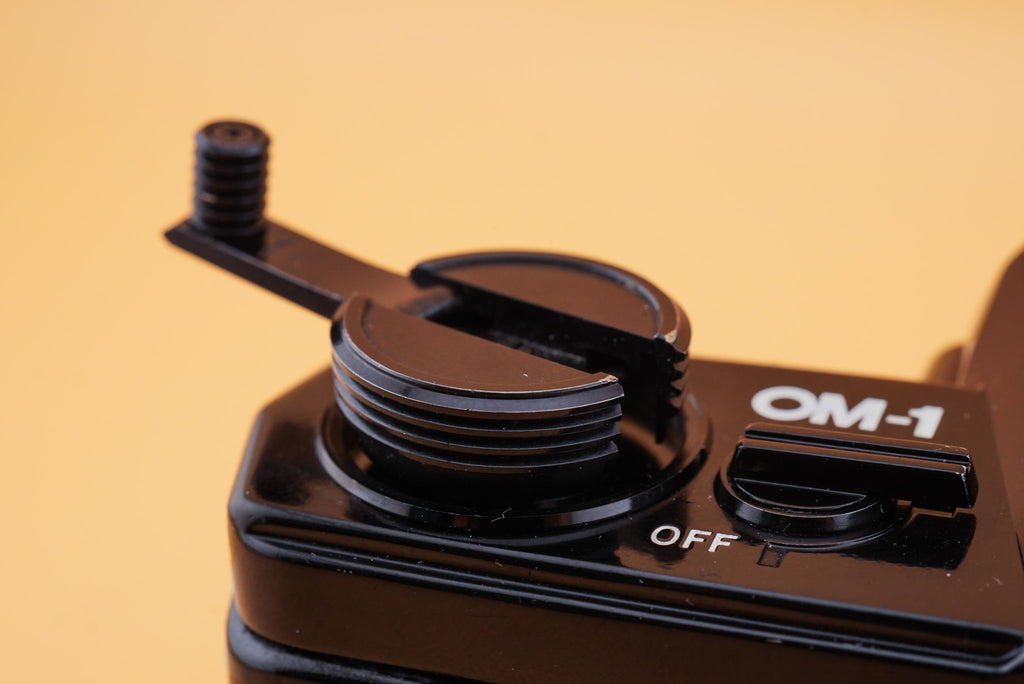
Going from left to right on the top of the camera, the first thing you’ll see is the rewind knob. We’ll use this knob when we want to rewind the film and load/unload the camera. We’ll get into the exact operation of it later, just good to know what it is for now!
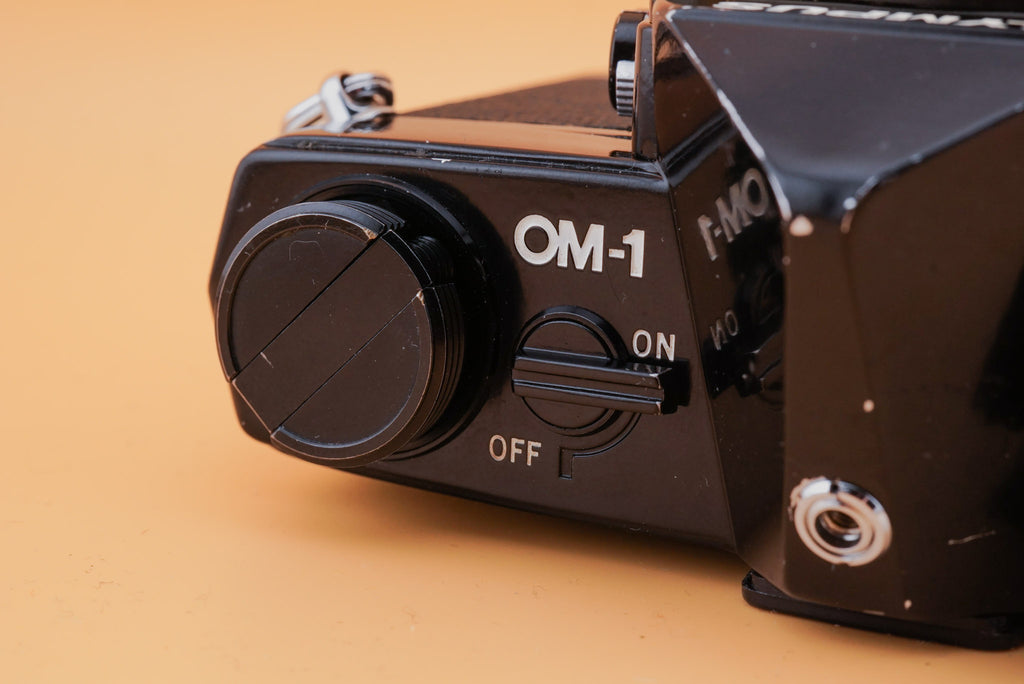
Next to that is a power switch. This is for the light meter inside the camera. When it’s facing “ON” the camera is metering light! It’s important to turn the camera off when you’re not using it to preserve battery life. With the OM-1, you have to do this manually.
Viewfinder & Flash Shoe Port
A bit further to the right, you’ll find the viewfinder and the flash shoe port. The viewfinder is where you look in order to focus and compose your photos. We’ll cover exactly what you’ll see a bit later. The more interesting of the two is the flash shoe port.
In order to cut down on size (and production cost) the OM-1 does not have a hot shoe by default. Olympus chose, instead, to leave a hole on the top of the camera and sell accessory hot shoes separately. Different OM models will require different hot shoes to work properly. It’s important to buy the right one if you want to use your OM-1 with a flash!

If your camera says “OM-1” above the power switch, you can use flash shoe #1. If your camera says “OM-1n” then you’ll want flash shoe #4.
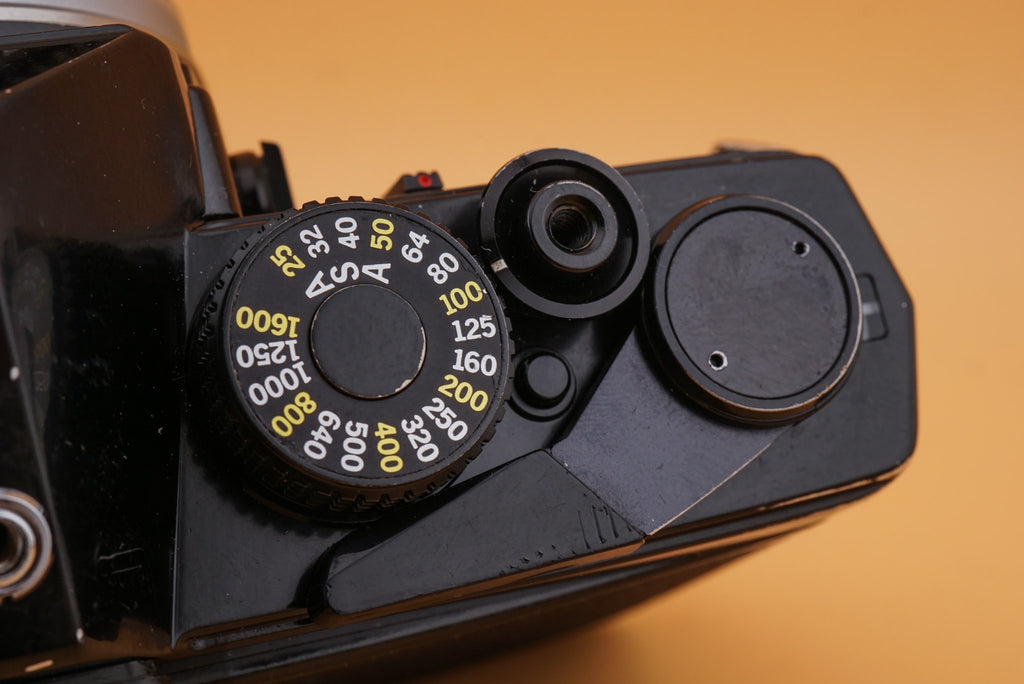
ISO Dial, Shutter Button, Film Advance Lever, & Frame Counter
The section to the right of the viewfinder and flash shoe houses some of the most important functions of the Olympus OM-1. We’ll start at the left with the ISO dial and work our way to the frame counter on the right.
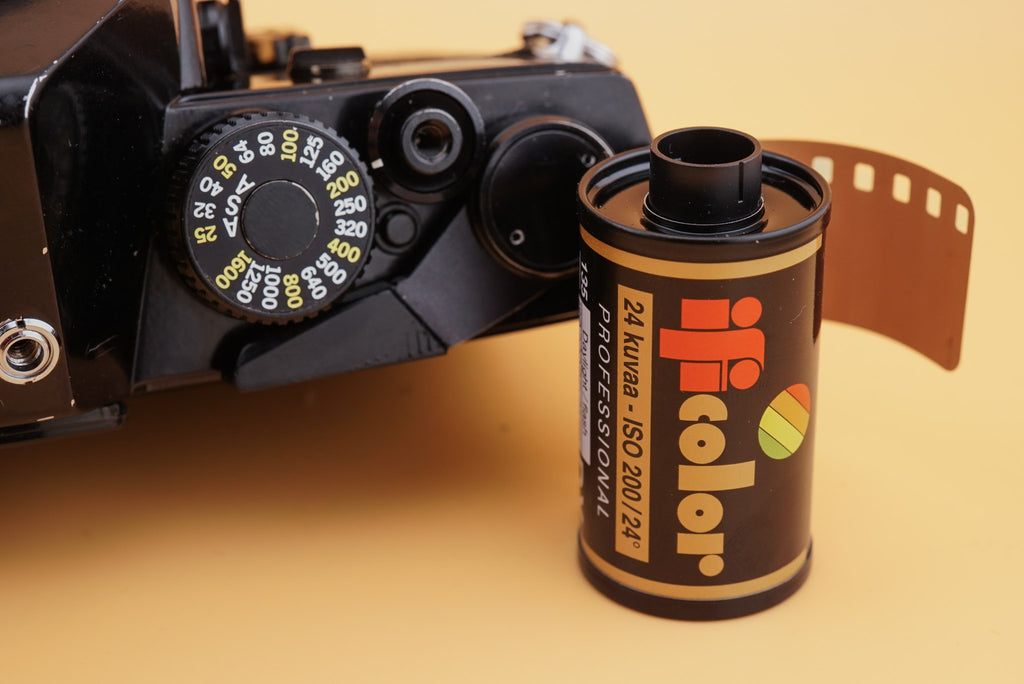
The ISO dial tells the camera what sensitivity your film is. Each film canister will have a number on it (anything from 6 to 6400) that represents how sensitive the film is to light. A higher number indicates a more sensitive film that will be better at capturing good photos in low light but won’t be as sharp as something with a lower number. We won’t get more in-depth than that here.
To rotate the ISO dial, you’ll have to press a small button next to it. Line up the number on your film with the dash on the shutter button ring next to the dial and the camera will know what film you’re using!
Next up is the shutter button. This is one of the things you’ll be touching the most, because it’s what triggers the shutter! When the film is wound, pressing this button will actually take the photo. Pretty simple, even if the mechanics at work inside the camera are anything but simple!
Related to the shutter button is the film advance lever. Since the OM-1 is a manual camera, you’ll need to wind the film yourself. After every shot, you’ll have to pull this lever out a bit less than 180º. When you reach the point where you can’t pull anymore, you can let go and the lever should snap back into place.
Not only does this lever move the film, it also prepares the shutter to fire again! That’s how the Olympus OM-1 can function without batteries.

The final feature on the top plate is the frame counter. It’s a small window next to the advance lever that tells us how many shots we’ve taken in a roll. It counts upwards from 1, so it works for film rolls regardless of how long they are. It will move up every time you pull the advance lever and will reset if the film back is opened.
For reference, most film rolls have 24 or 36 shots on them. The frame counter can go up to around 40, though, because sometimes you can sneak an extra shot or two out of a roll if you're careful when loading!
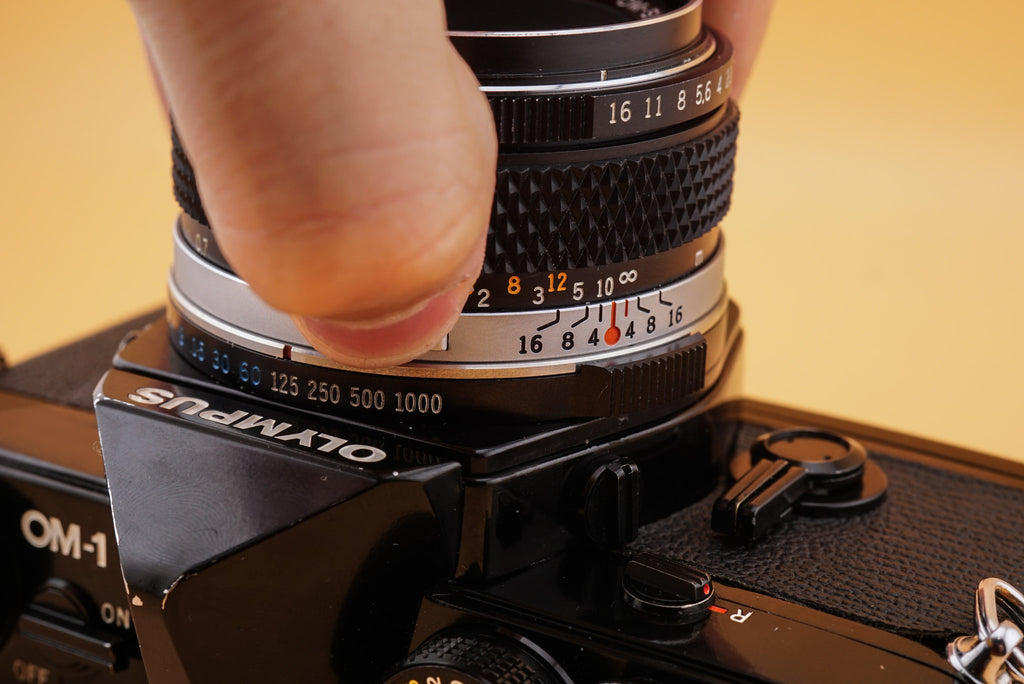
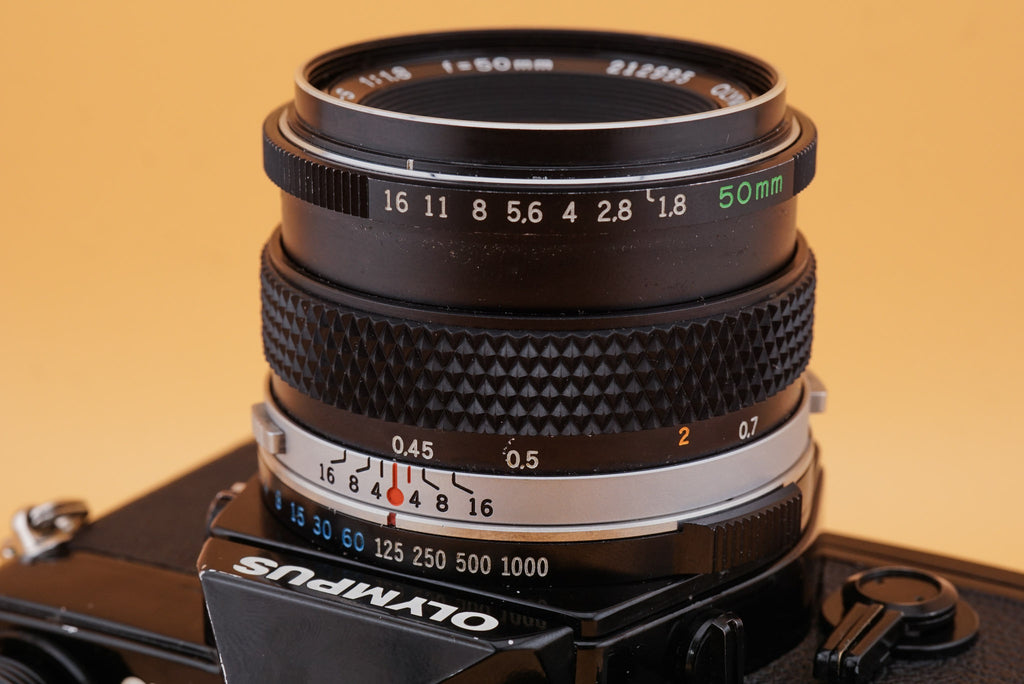
Shutter Speed Dial
Next, let’s hop to the base of the lens and look at the shutter speed dial. As I said earlier, the OM-1 has its shutter speed ring around the lens instead of on the top plate. The idea was to have all the photography-related settings easily accessible with one hand.
The shutter speed dial controls how long the shutter is open. A longer shutter speed will let more light in, which is necessary in low-light situations. Long shutter speeds, however, can cause camera shake. For beginners, it’s recommended to use a tripod with shutter speeds of 1/60s and below. At 1/125s and above, you should be able to hold the camera steady!
For more advanced users looking to capture fast motion, like animals, cars, or sports, try using 1/1000s or 1/500s. Fast shutter speeds are necessary for capturing motion like this.
The one other shutter speed that might stand out is "B". It looks weird because it's the only speed that's not a number! B stands for "bulb" and means the shutter will be open as long as you hold the shutter button down. This is a moderately advanced technique normally used for long exposures, so don't worry if you don't feel comfortable using it yet.
Play around with shutter speed to see the effects!
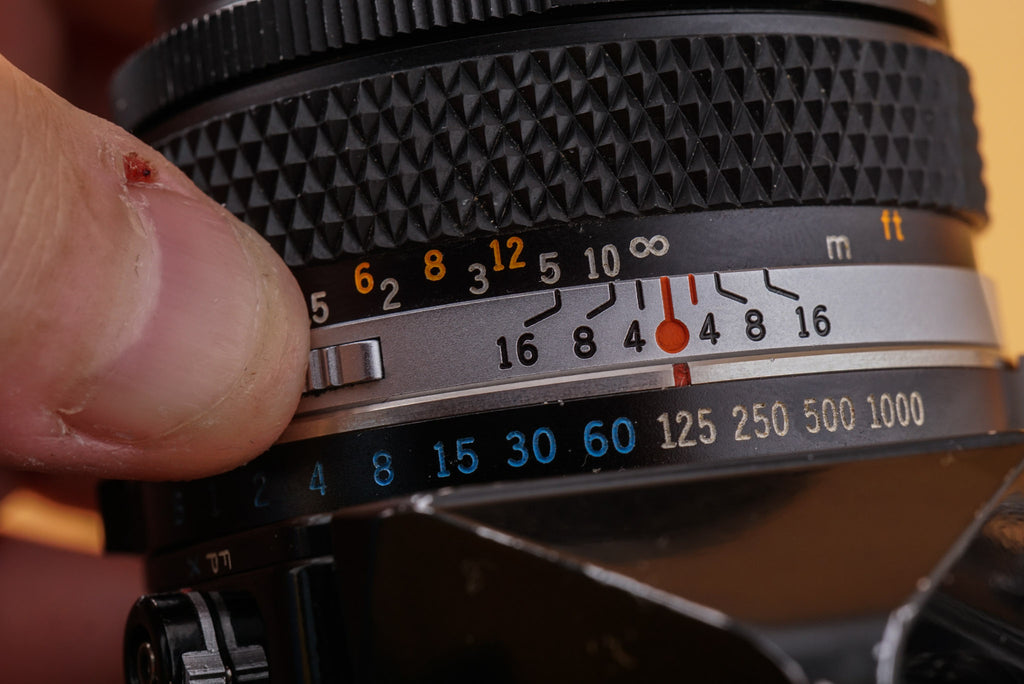
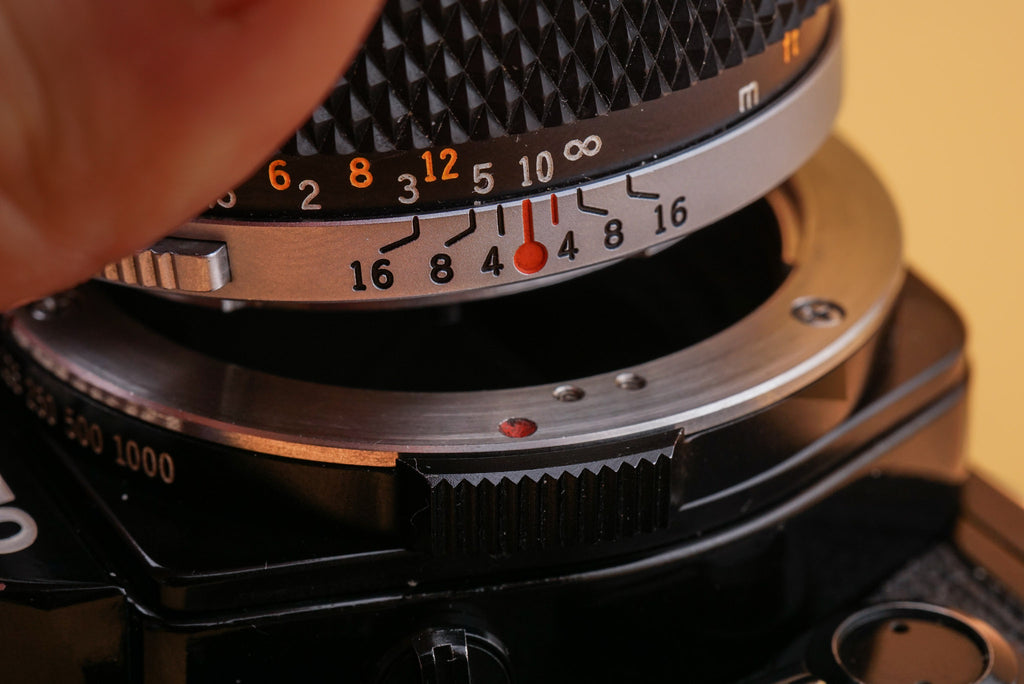
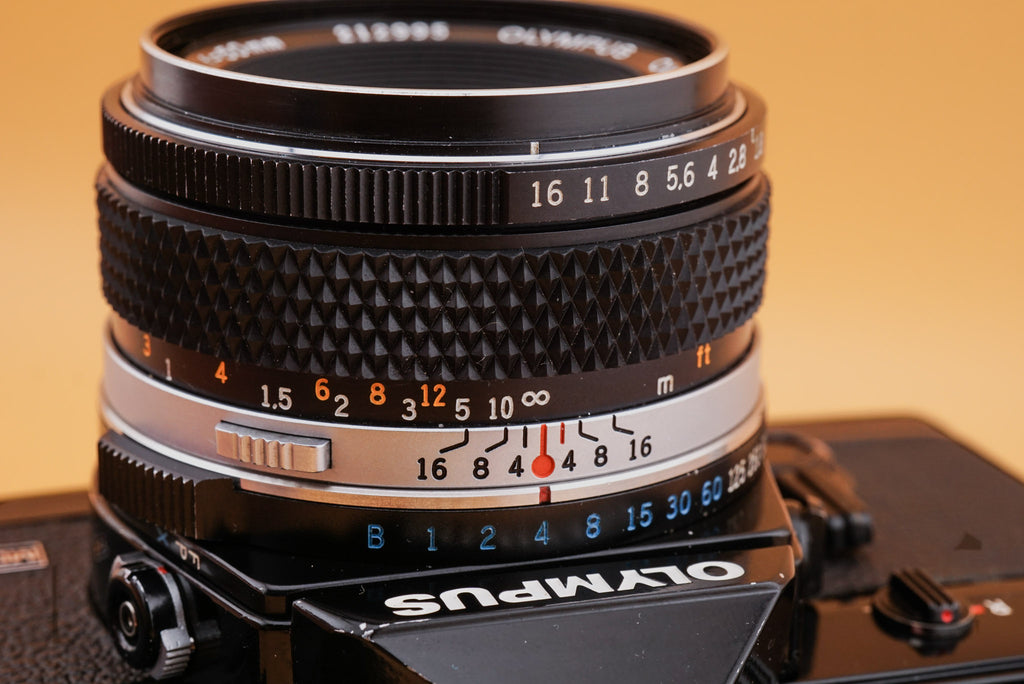
Focus Ring & Depth-of-Field Scale
Next up is the focus ring! Well, the focus ring and depth-of-field scale. They work together to tell us what will be sharp and what will be blurry.
The red line is our focus indicator. It points upwards to the distance scale on the focus ring. As you turn that focus ring, the numbers (in feet and meters, usually) that line up with the line tell us how far away our subject should be.

The numbers to the right and left of the red line are our depth-of-field scale, also known as a hyperfocal scale. When used with aperture numbers (we’ll get to those very soon!) this scale can give us a range of distances where everything should be sharp. For example, if we use f16 as our aperture we can get everything from 2m to 10m in focus at once!
With the standard 50mm lens we have here, we can focus down to 0.45m. That means that an item 0.45m away would be in focus!
Aperture Ring & Depth-of-Field Preview
The last ring on the lens is the aperture ring. The aperture is an opening inside the lens that closes right at the moment when you fire the shutter. This controls how much light is let through at once, which mainly affects depth-of-field.
A larger aperture number correlates to a more narrow opening. This lets less light in, but gets more things in focus. Apertures like f8, f11, or f16 will give you a wide area of focus, which is great for landscape photography and environmental portraiture.
Smaller aperture numbers let more light in and contribute to a more shallow depth of field. If you’re looking for a sharp subject and a blurry background, try wider apertures like f1.8 or f2.8. Lower aperture numbers will also make it possible to take usable photos in low-light environments.
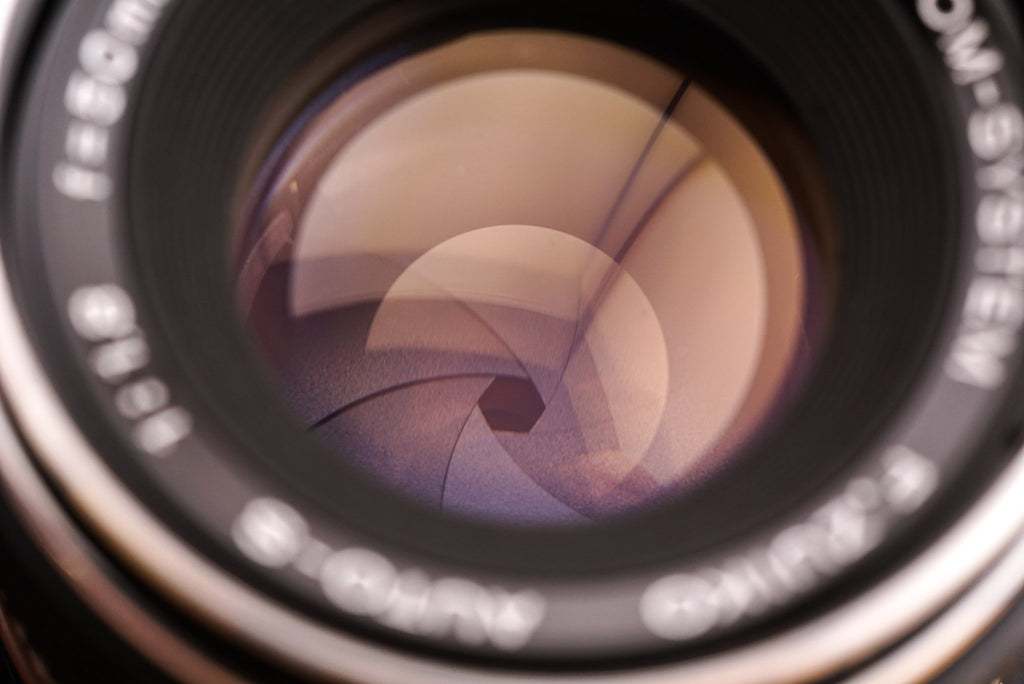
Nothing will happen when you turn the ring, but it is possible to preview your aperture before firing the shutter. Do this by pressing the button on the bottom of the lens. You should see the lens’ aperture close down (like the photo above).
Rewind Switch & Self-Timer
Switching back to the camera body, there are two features on the front-left worth talking about. These are the rewind switch and self-timer.
The rewind switch is essential for rewinding the film when you finish a roll. In order to maximize sharpness, the OM-1 will hold the film very tightly when you’re shooting. This keeps the film flat when you’re taking photos, but it also means you can’t rewind the film. By rotating this dial from an up/down orientation to a left/right orientation, the tension is released and the film can be rewound.
Directly below the rewind switch is the self-timer. By pulling this lever to the left, you’ll activate a mechanical countdown that starts when you press the shutter button. The camera will make a loud, grindy sound and the lever will slowly creep back towards its original position. Once it gets there, the camera will fire the shutter and take a photo. This is great for group shots or self-portraiture!
Mirror Lock-Up & PC Sync Port
Next, we’ll move to the sides of the lens mount area and talk about some more advanced features. These aren’t necessary for normal photography, but can help you later down the line!
On the left side of the camera, next to the rewind switch, is our mirror lock-up switch. It works similarly to the rewind switch, you rotate it to move the mirror up (vertical orientation) or down (horizontal orientation). The mirror moves up and down on its own when the switch is set horizontally, so this switch is only for very specific purposes.
 |
 |
One situation where you’d use the mirror lock-up is long exposure photography. If you want to have the shutter open for a long time, even over a minute, the tiniest shake can ruin the whole shot. Even the tiny shake that happens when the mirror moves up and down. So for long exposures, you should: 1) frame, focus, meter, and compose, 2) lock the mirror up, 3) fire the shutter, and 4) put the mirror back down and wind the film.
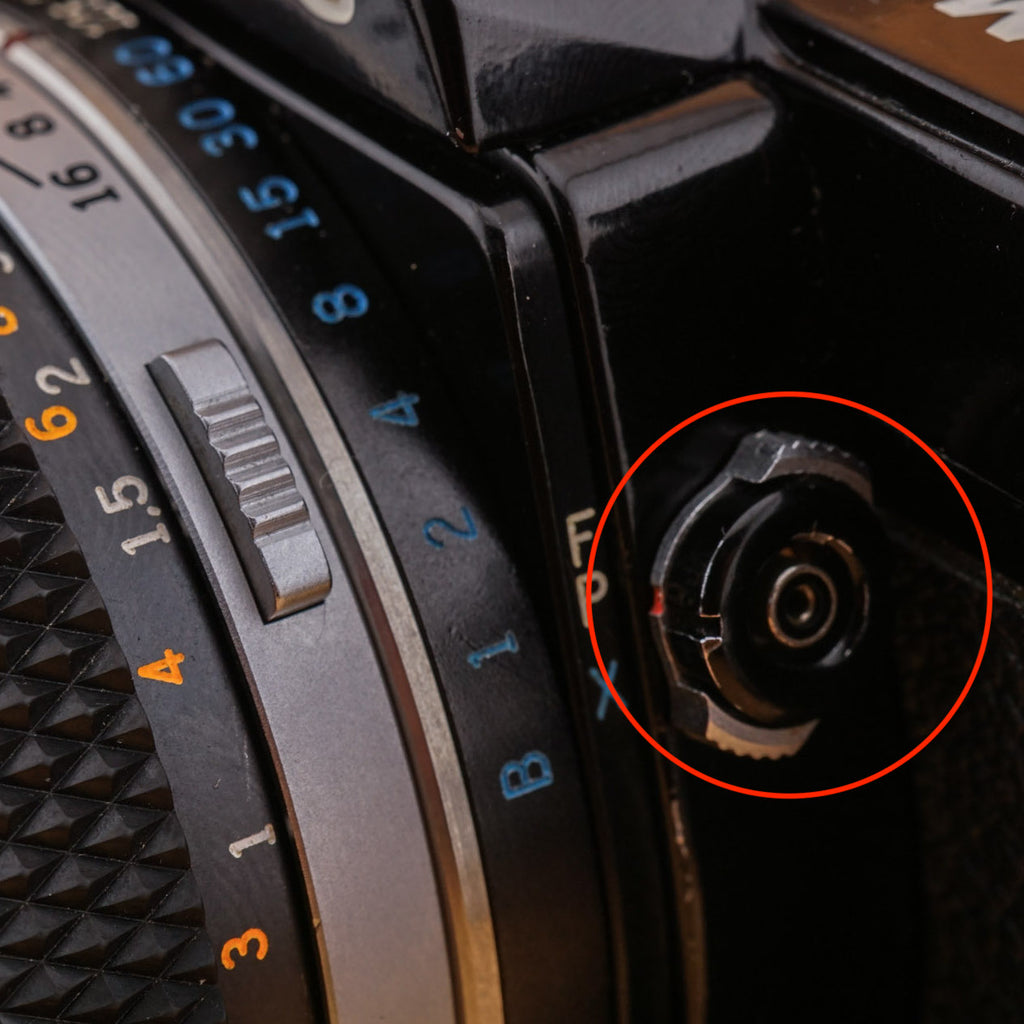
On the other side of the lens mount is our PC sync port. If you’re familiar with film cameras, you’ll know this is a port for connecting a flash. Some older flashes don’t have the contact pins to connect to a camera’s hot shoe, so you’d use a cable to connect the camera to the flash. This can also be used for off-camera flash setups!
You may notice the switch around the port with 2 settings; X and FP. For a newcomer to the system, just flip it into X mode and leave it alone. The FP setting is for more advanced users with very specific flash setups. Remember, when using the flash in X mode you should set the shutter speed to 1/60s!
Now we’ve covered basically everything on the top and front of the camera, let’s talk about the bottom!
Battery & Motor Drive Covers
The bottom of the camera is mostly where we store things and connect accessories like tripods, flash brackets, and motor winders. It’s not a place you’ll be touching a lot, but it will probably wear out over time since the camera is likely to be set down right-side up! Don’t be surprised if your Olympus OM-1 is quite worn on the bottom plate. Some of them are over 50 years old at this point!
Going from left to right as usual, the first thing we see is the battery cover we used earlier. As mentioned above, this cover hides a PX625 battery outputting 1.5v of electricity into the camera’s light meter. Make sure this cover is tightly secured at all times or you may lose it!

Next to the battery cover is another very similar coin-slot cover. This one, however, only covers some gears. What do these gears do? Well, they let the camera advance film automatically! Most Olympus OM-1 cameras have this motor drive (MD) capability. Only the very oldest OM-1s lack support for the motor drive. The motor drive is a large black grip that makes the camera more secure to hold and provides a secondary shutter button.
That’s not even to mention its main advantage: automatic film advancing! With the motor drive, you’ll never need to pull the film advance lever again. After you take a photo, the camera will automatically prepare itself to take another photo. Pretty cool, and all it takes is a few AA batteries in the motor drive!
The motor drive also communicates with the body using the 2 electrical contacts a bit further right on the body.
Tripod Socket & Serial Number
Just a bit further right is a threaded hole. For the uninitiated, this is how you’d attach the camera to a tripod. The Olympus OM-1 uses a standard ¼” tripod screw, which should allow it to connect to most consumer tripods. There are also a wide variety of accessories that can be attached to a tripod socket, from straps and flash brackets to external grips. It’s worth playing around with the accessories you can find in order to find out what you like or don’t like!
Further right, you’ll see the electronic contacts I mentioned above. Like I said, these are part of the motor drive functionality. The number next to it, though, is the serial number. Unfortunately, this number doesn’t correspond with the year of production so it’s not so easy to know when your particular OM-1 was made. But it is a way to remember your OM-1!
With that, we’ve covered just about everything you need to know about the buttons, dials, and switches of the OM-1. Next, we’ll talk about how to actually use the camera!

Camera Operation
In this section we’ll discuss how to load and unload film, what you’ll see through the viewfinder, and how to know your photos will be properly focused/exposed. From there, all that’s left is to pick something nice and take a photo of it!
How to Load Film
Loading film in an Olympus OM-1 is very similar to other 35mm SLRs. If you’ve loaded one before, it’ll be easy to figure out. If you haven’t, no worries! That’s what this guide is for.
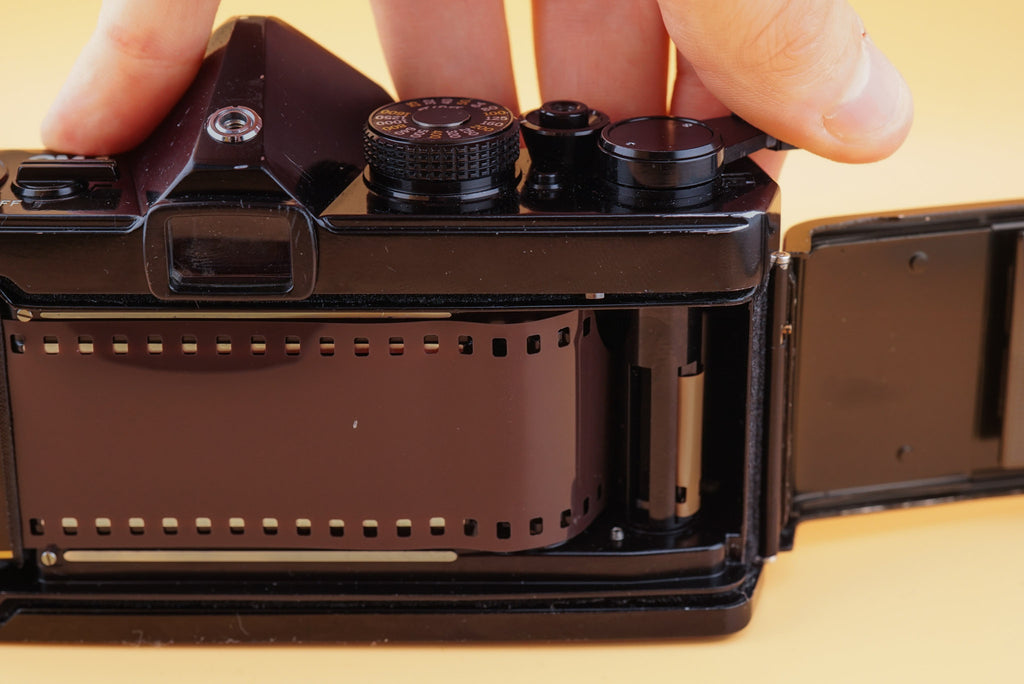
Start with the camera upside down, resting on the lens. Take the rewind knob we mentioned earlier and pull it up. It should extend a bit and then stop. Pull it a bit harder and the film back should pop open! It’s spring-loaded, so it should have quite a bit of force behind it. If it doesn’t, there may be something wrong with the camera!
 |
 |
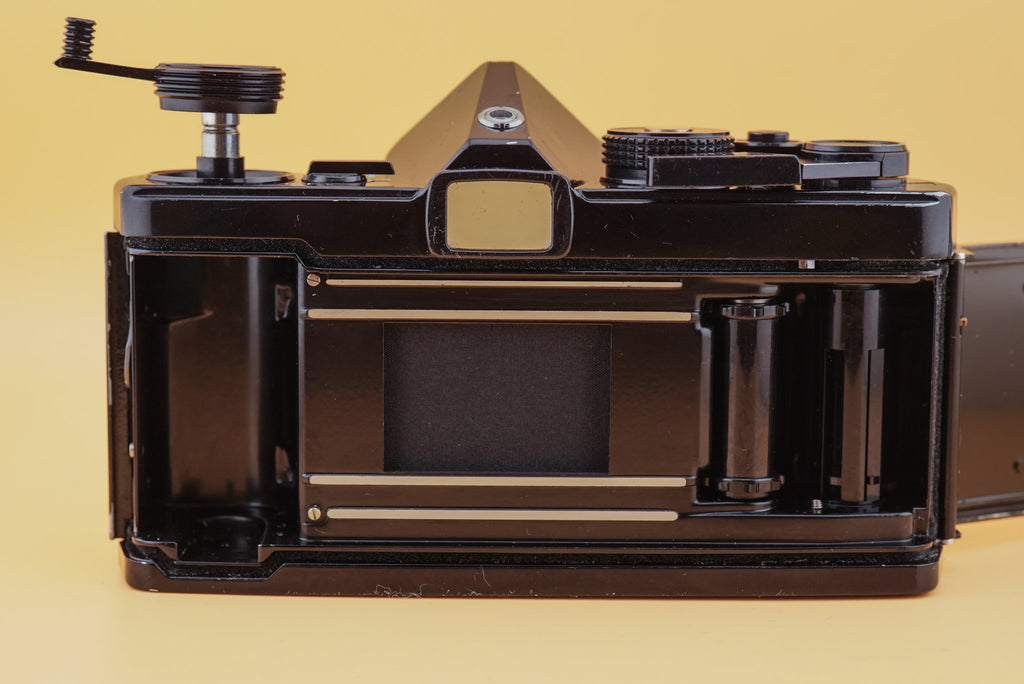
Regardless, now we can fully open the back and see the inside of the camera. From left to right we’ll see the the film compartment, shutter, advance spool, and take-up spool. All of these work in conjunction to get the film in the right position and then capture a photo on it. It’s pretty complicated, and these are just the parts that are visible!
 |
 |
Loading the camera, thankfully, is pretty simple. What you’ll want to do is take your roll of film and put it into the film compartment. You can then press the rewind knob back down, it has slots that fit into the film canister to hold it in place. Make sure you put the film canister in the same way I did in the photo below (with the canister’s “bottom” facing upwards). It won’t fit the other way, but don’t try to force it!
 |
 |
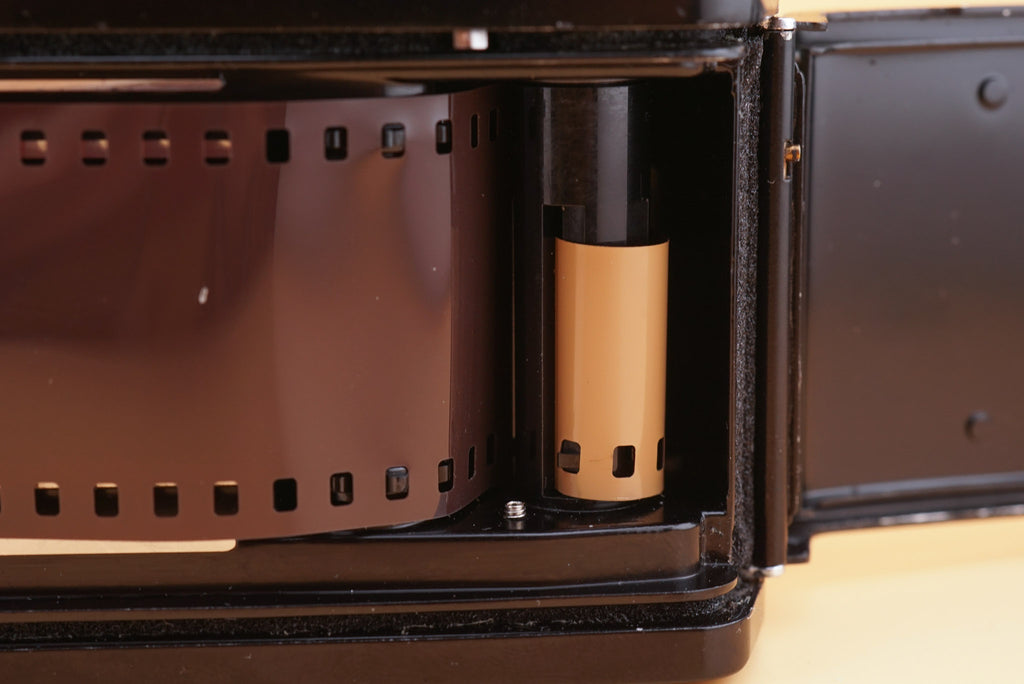
Next, you’ll want to pull the film leader (the thin section at the end of most rolls of film) across the shutter. Try not to touch the shutter, it’s quite sensitive. Pull the film until it reaches the spool all the way to the right.
Taking a look at this spool, you’ll see it has indents with one small tooth at the bottom of each. This is what grabs the film and pulls it. For a demonstration, you can wind your film advance lever and watch the spools move. One moves left, and one moves right. So the film is pulled between them!
 |
 |
Take the film leader and push it into one of the indents, making sure the holes on the film line up with the tooth on the spool. Once it feels secure, pull the advance lever. The film should be pulled tight against the inside of the camera. If the film comes disconnected from the spool, don’t worry! It can be tricky to line it up properly. Just try again until the film is pulled successfully. You’ll be able to see the lighter-colored side of the film wrapped around the spool if you’ve done everything right.
If this isn’t your first roll, you can close the film back here. But for a first-time user, I would recommend firing the shutter and winding the film one more time just to be 100% sure your film is attached properly. You’ll lose a shot or two from your roll, but that’s better than losing an entire day of memories because the camera wasn’t loaded properly, right?
Once you’re confident that your camera is loaded properly, close the film back. It should click back into place. Now we can pick the camera up and look at the top plate. Specifically, we want to look at the frame counter.
We need to advance the film and fire the shutter until the frame counter’s indicator lines up with the number 1. This will make sure our first actual shots don’t have light leaks from our loading procedure. After that, you’re ready to take photos!
How to Rewind & Unload Film
Basically, rewinding film is the same process but in reverse! Okay okay, there are a few extra steps.
You’ll know you’ve finished the roll because you won’t be able to advance the film anymore. It’ll feel quite tight and resistant. Don’t force the advance lever or you could rip the film!
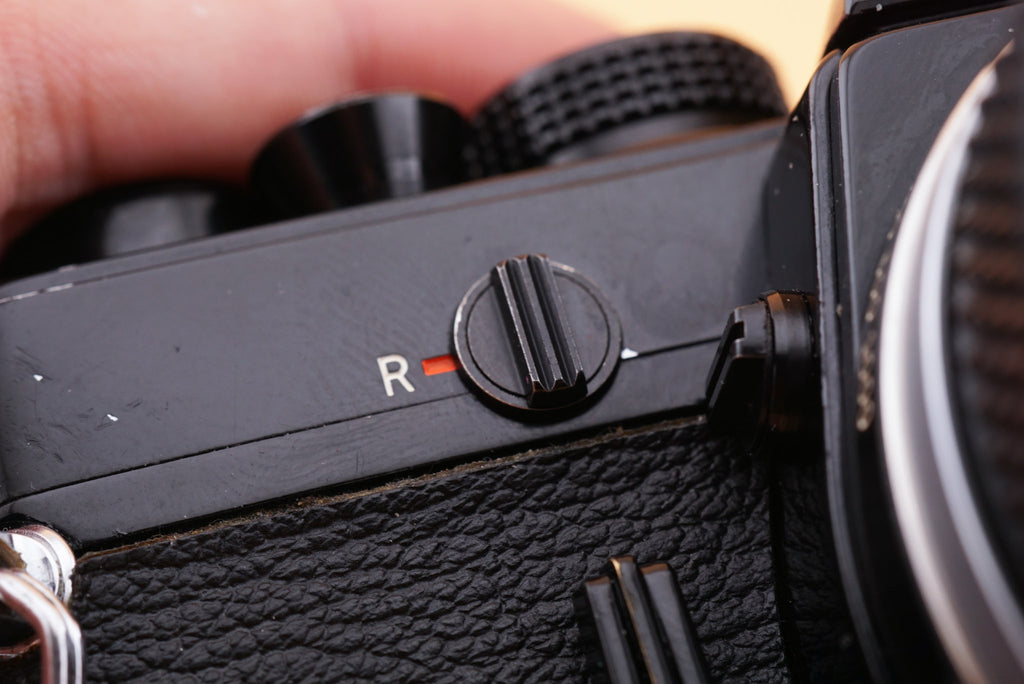
Once the roll is done, you can rewind it. To do this, flip the rewind switch we mentioned earlier to the R position. There’s no need to hold it there once you’ve flipped it, it’ll stay on its own. Then we can use the rewind knob to rewind the film. It makes it a lot easier if you flip out the rewind knob’s lever arm.
It may take a while to rewind the film, but eventually, you should hear a small click and notice that there’s much less resistance on the rewind knob. This means that the film has disconnected from the take-up spool! Just rewind a bit more and the film should go entirely back into the canister, just how a lab would want it. Once you feel confident the film is fully rewound, you can open the film back (just like before) and remove the canister!
With that, you’re totally ready to bring your film to a lab for processing! Congratulations, you’ve successfully loaded, shot, rewound, and unloaded a roll! But wait, we haven’t talked about the actual shooting part yet.. Okay, let’s get inside the viewfinder!
The Viewfinder
The camera’s viewfinder tells you what the photo will look like when you take the photo. Since the Olympus OM-1 has a light meter, it can also tell us whether or not our photo will be properly exposed. A lot of information is conveyed by the viewfinder, so it’s important to understand what the camera is telling you. Let’s start with focusing.
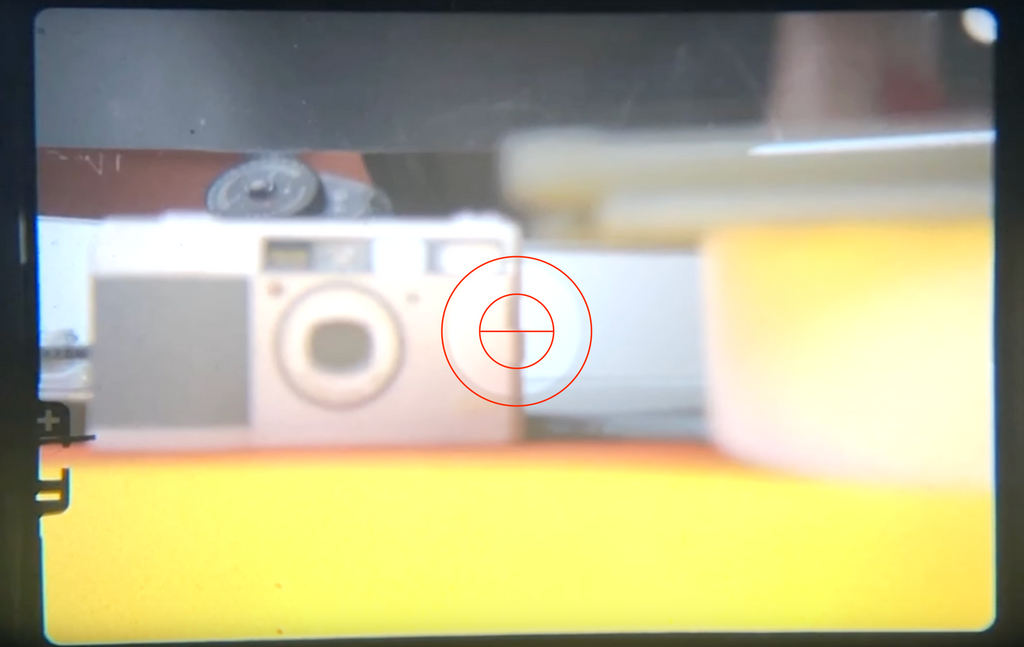
Focusing Aid (Split Prism)
In the center of the viewfinder there should be a focusing aid of some kind. Most Olympus OM-1s have a “split prism” surrounded by “microprisms”. All these prisms are meant to help you get your subject in focus so they’ll be sharp in the finished photos.
The split prism is the circle in the middle with a horizontal line through it. If you rotate the focus ring on the lens while looking through the viewfinder, you should see the top and bottom sections of this split prism move left and right. Your goal is to make the top and bottom line up! If you do that, whatever is in the center of the frame will be in focus.
Try focusing on something close to you and then pointing the camera at something far away. If the split prism is lined up correctly for the close object, it won’t be lined up for the far-off object. You’ll need to refocus on subjects at different distances.
Surrounding the split prism is a ring of what are called microprisms. These help with focusing just like the split prism, but in a different way. If you look at an out-of-focus object through the microprisms, you’ll notice a “texture” on the object. The more out of focus, the stronger this texture. To achieve proper focus with the microprisms, rotate the focus ring until the object appears normally.
By using these two focusing aids (and some practice) you should be able to quickly and easily focus on most things! Now that we’ve got the subject in focus, let’s make sure the photo will turn out properly by looking at the light meter.
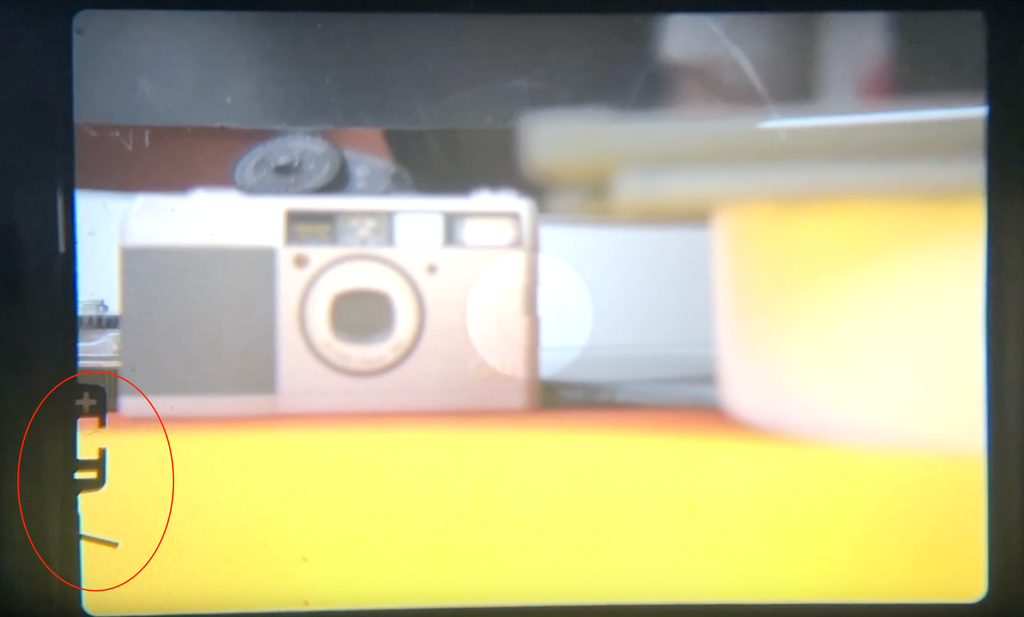
The Light Meter
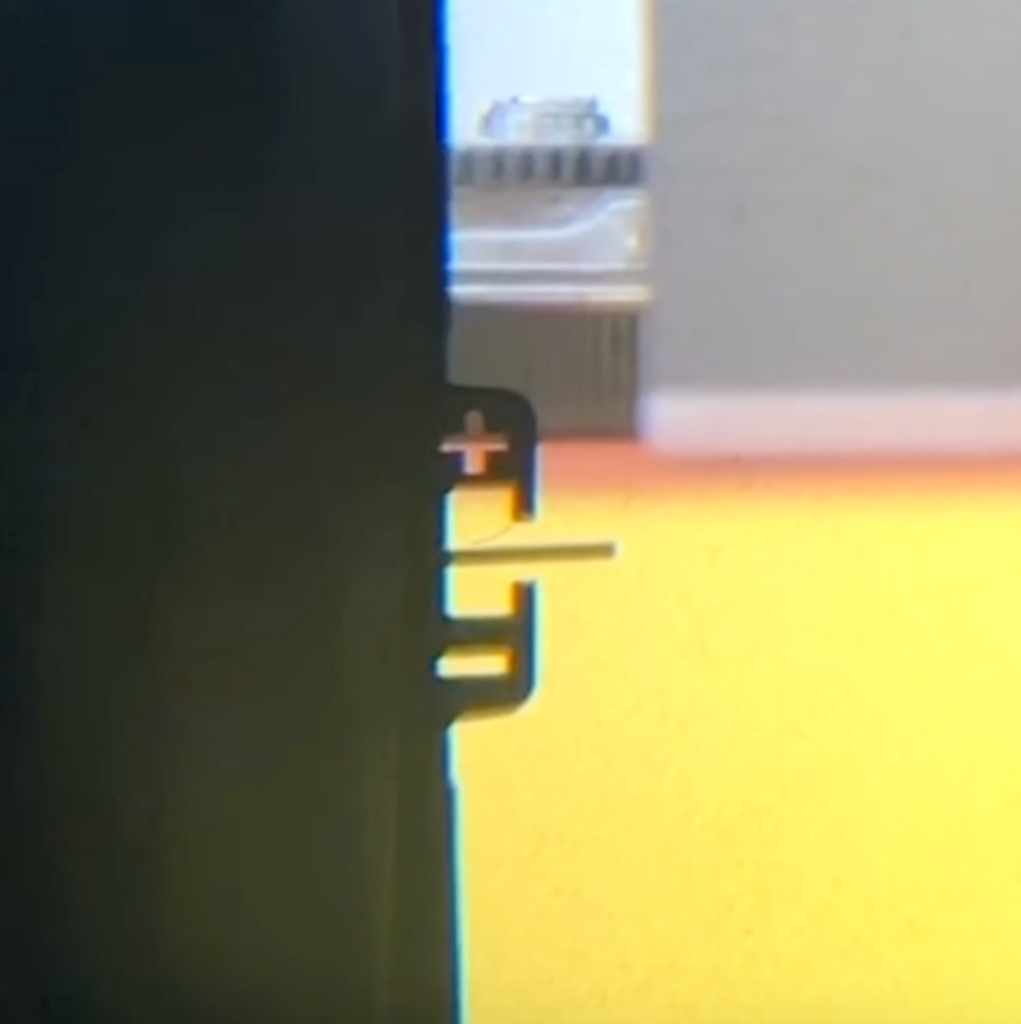
You’ve probably already noticed the needle in the bottom left of the viewfinder, as well as the + and -. This is our light meter readout. The Olympus OM-1 uses what’s called a “match-needle” system where our goal is to get the needle to a certain spot in order to have proper exposure.
First, make sure the power switch is turned on. When it’s off, the needle will be all the way at the bottom of the finder and won’t move. If you turn it on while looking through the viewfinder, you should see the needle jump up. If you don’t, make sure your battery is installed correctly and has enough charge left.
Generally, the goal is to get the needle halfway between the + and -. The + represents overexposure, or the photo being too bright, and the - represents underexposure, or the photo being too dark. Remembering the rules we talked about when discussing shutter speed and aperture above, try playing with different shutter speeds, apertures, and lighting conditions to see what works and what doesn’t work.
For your first few rolls, I’d recommend just trying to get the needle right in the middle. After you feel comfortable with that, you can start experimenting with intentionally over or underexposing your shots for creative effect. Some people really like a slightly overexposed photo, but underexposure can create dramatic areas of black or shadow. There’s a lot of potential, and it’s up to you to figure out the camera so you can take advantage of it!
Common Issues & Conclusion
The Olympus OM-1 is a wonderfully constructed camera with tons of features in a small, handsome package. It can be an excellent first camera for those looking to dive into manual photography, but it can also be the only camera you ever need. That being said, it’s important to make sure that your camera works properly.
If an OM-1 hasn’t been used in years, there are a number of things to check before putting a roll inside. One is the sound and feel of the mechanisms. Some OM cameras tend to get gunky, with lubricants freezing or collecting dust over time. This will make things feel rough, stiff, slow, or just not good. If your back doesn’t open properly or your film advance lever doesn’t snap back to its original position when you wind the film, this is what I mean.

If it’s affecting the parts of the camera you interact with, it’s also likely affecting the internal mechanisms that control shutter speeds, communication between the camera and lens, and the light meter. Unfortunately, this is really difficult to test on your own without special equipment.
Speaking of the lens, it’s also important to check that. You can take the lens off the camera and shine your phone’s flashlight through it. This will illuminate any issues that may exist inside the lens. Some dust inside the lens isn’t an issue, but if you see something that looks foggy or something that looks like spiderwebs, that’s an issue. The spiderwebs are fungus, and this will grow over time and can possibly even spread to the camera itself. Not fun.
One thing you may see when testing an OM camera, especially an OM-1 or OM-2, are some gross marks inside the viewfinder. This is desilvering, and typically appears near the bottom corners of the viewfinder. Desilvering is caused by the foams that keep the camera's glass prism safe deteriorating and eating away at the silver coating of the glass. This can't really be fixed once it's happened, and it's pretty common on OM bodies. It can be stopped if the foam is cleaned and replaced, though!

If you feel like you just want a camera that works, you can always check our website. We have trained mechanics who inspect and repair OM-1s every week. It costs a bit more, but it can save you money in the long run and give you a welcome peace of mind.
Otherwise, that’s been a (not-so) brief overview of the Olympus OM-1. Thanks for sticking with me throughout the article and hopefully you learned something by reading this! If you have any questions at all about using your camera feel free to reach out to us on Instagram (@Kamerastorecom), via email (info@kameratori.fi), or via the chat function of our website. We’re always happy to help. (-:
0 comments